Building Blocks Baby Blanket
A simple yet sweet baby blanket knitting pattern
Sometimes you don’t need a complicated pattern, or some complex to make something that looks really nice. Sometimes you just need a bit of color, and the basics and you get whip together an incredible present that will mean the world to some mom to be in your life.
That’s what the building blocks baby blanket pattern is designed to be:
A simple yet totally functional baby blanket.
The building blocks baby blanket looks great draped over a crib or chair, swaddling a little nugget of a babe, or tucking them into their stroller for a brisk walk.
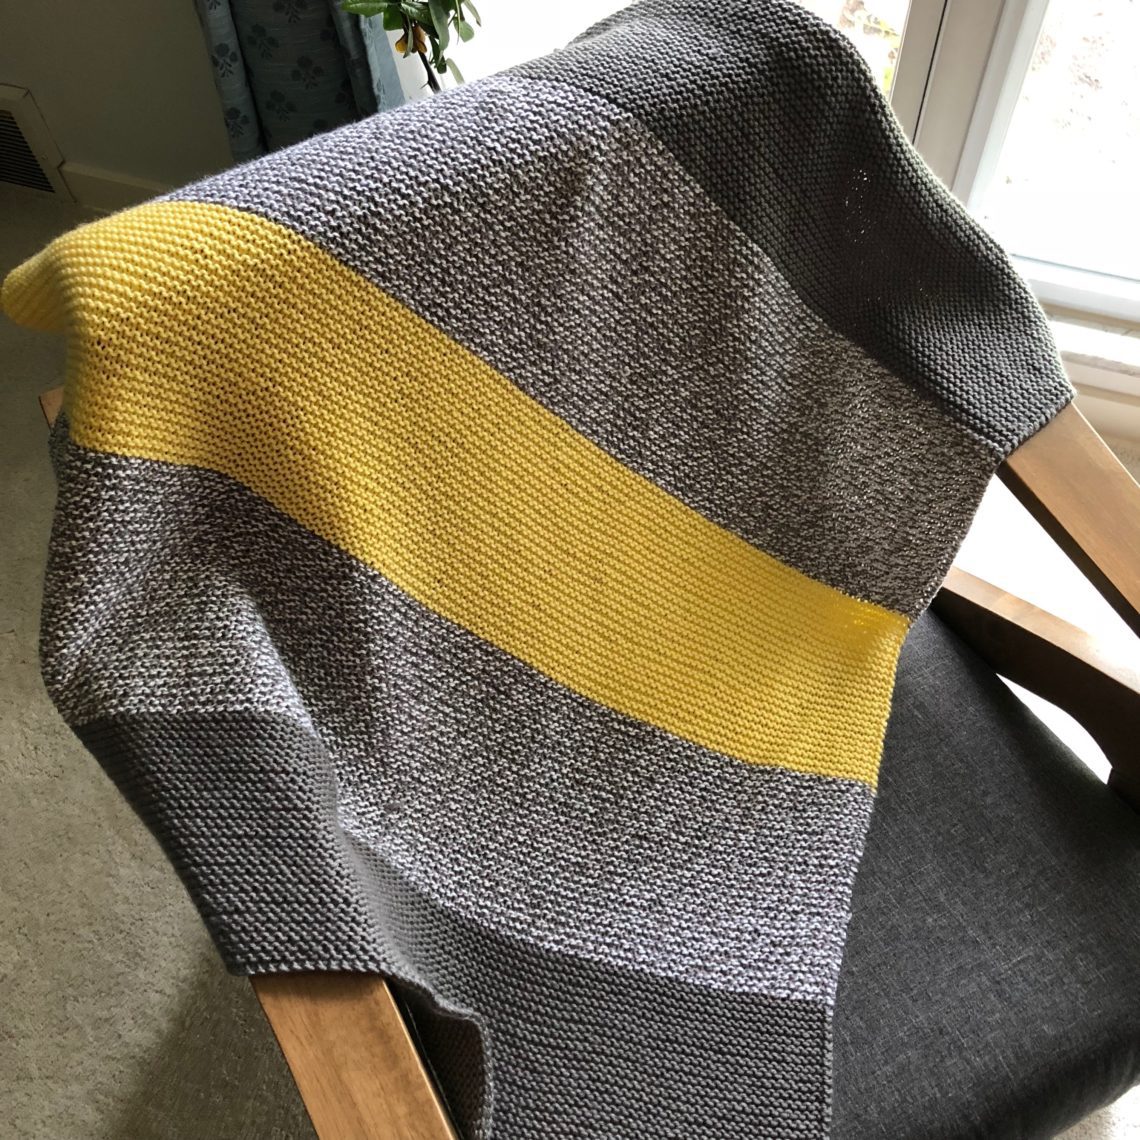
Yarn: All you need for this pattern is three colors that look fabulous together, in your choice of worsted weight yarn.
I chose a few yarns from Premier Yarns. Two were from Deborah Norville and one was from the regular everyday collection. All were anti-pilling which is great for babies.
Color 1: Steel
Color 2: Grey Marl
Color 3: Lemon
Gauge: 18 STS X 24 rows = 4”X4”
Abbreviations:
CO: Cast On
STS: Stitches
Care Instructions: Machine washable, tumble dry
Needles: Size US 8 circular needles, Tapestry needle. I like circular needles for knitting blankets because the weight of the blanket stays more centered than resting on one of the needles.
Begin Building Blocks Pattern:
CO 140 stitches using Color A.
I have used the Long Tail Cast On, you can view a video of this tutorial here:
Row 1: Slip first stitch knitwise, knit 139. *this will help to keep the rows even and flat.
Rows 2-55 repeat first row.
Row 56: Knit entire row. (Slipping first stitch will cause the Color A to bleed into Color B)
Break remaining yarn leaving a tail to weave in at the end of the project.
Note: I pretty much just knit until I’m almost out of yarn and ending on an even row to make sure that all of the color changes are on an odd row (and hide the different color purl bumps on the back)
Switch to Color B:
Row 1: Knit entire row.
Rows 2: Slip first stitch knitwise, knit 139 sts
Row 3-55 Repeat Row 2
Row 56: Knit entire row
Break remaining yarn leaving a tail to weave in at the of the project.
Switch to Color C:
Row 1: Knit entire row.
Rows 2: Slip first stitch knitwise, knit 139 sts
Row 3-55 Repeat Row 2
Row 56: Knit entire row
Break remaining yarn leaving a tail to weave in at the of the project.
Switch to Color B:
Row 1: Knit entire row.
Rows 2: Slip first stitch knitwise, knit 139 sts
Row 3-55 Repeat Row 2
Row 56: Knit entire row
Break remaining yarn leaving a tail to weave in at the of the project.
Switch to Color A:
Row 1: Knit entire row.
Rows 2: Slip first stitch knitwise, knit 139 sts
Row 3-55 Repeat Row 2
Row 56: Knit entire row
Bind off – I use a knitted stretchy bind off:
Step 1: Knit the first two stitches
Step 2: Knit them together through the back.
Step 3: Knit the next stitch.
Repeat Steps 2 and 3 until you have one live stitch on the needle.
Break Yarn and thread through the live stitch.
Use Tapestry needle to weave in the tails of yarn.
Suggested presentation – the colors in this blanket speak for themselves. Rather than wrap it up and cover them up with paper or shove it in a gift bag, consider neatly folding the blanket and tying a simple ribbon around it and securing the ribbon with a bow. 1” thick ribbon is perfect!
Questions or edits or just want to share your photos with me? Please email me!